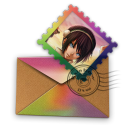
Monday, November 23, 2009

This tutorial was written by me on November 23, 2009 using PSP X2. Any similarities to any other tutorial are purely and not intentional.
This tutorial is written for those with a working knowledge of PSP and Amimation Shop.
Supplies needed:
I'm using a Suzanne Woolcott tube, found HERE
The kit is a FTU scrap from Yanna, called "Merry Christmas 2009" found HERE
Mask find HERE please leave some love if you download.
Font: 2Peas YoYo
Plugin: Eye Candy Nature - Snow Drif (optional)
My Supplies HERE
Animation Shop.
Open a new canvas 600 x 600 and floodfill with white. Add a new raster layer. Select all.
Open mask.
Open xmasbg#3 resize by 18, copy and paste into selection to your new canvas.
Apply mask to the bg#3.
Resize wreath#4 by 15 copy ad paste above mask.
Resize xmasbg#5 by 15.
Open Christmas BG supplied resize by 85.
Copy bg#5 and Christmas BG supplied & paste between mask and wreath#4.
With selection tool point to point make a selection around the wreath.

We are goint to save this selection for later,
Go to Selection - Load/Save Selection - Save Selection to Alpha Chanel, name the selection now and save.
Then Selection - Invert and hit delete in your keyboard to the bg#5 and Christmas BG layer. Deselect now.
Resize Bulb#4 by 8, copy & paste above the wreath layer and move to the left side.
Resize Bow#2 by 18, copy & paste above the Bulb#4.
Copy & paste bulb#5 resized by 3, above the Bow.
Open Tree#2 resize by 15, copy & paste to the right side above the wreath.
Resize snowman #1 by 10 copy & paste to the right side of your canvas.
Place the tube of your choice and move it between the tree & snowman.
Resize Reindeersliegh by 13 copy & paste to the left side of your tag.
Add copyright and your name, I used the snowdrift plugin to the name with the following settings:

Animation:
Open Snow animation in your Animation Shop, select all frames, copy & paste in your psp,
if you are using a earlier version of psp Export Frames to PSP.
Ok, now you have the Snow layers (10 layers) and your tag, several layers.
Let's work on the tag fist, hide background, mask, BG#5 and Christmas BG layers.
Merge visible the rest of layers. Hide the layer you just merge.
Now merge visible the layers left, unhide. You now have 2 layers. We are going to add the snow.
Click on the first layer whitch is the BG - Selections - Load/Save selection - Load selection from Alpha Channel (find the one you named early). This should select around the wreat frame.
*Copy the first layer of the snow, Paste into Selection to your tag. Deselect.
Copy Merged and take it to the Animation Shop. Paste as a New Animation.
Back to the tag on PSP and undo twice.
Go now to the second layer of the snow, repeat same step you did with the first layer of snow (*) But now Paste After Current Frame. Keep repeating that until you get all 10 layers of snow (you should have 10 frames in Animation Shop.
View Animation , If animation is ok then Optimize and save as a GIF.
You are done! Thank you for tryng my tutorial. If you have any question please contact me.
I would like to see your result. If you have any comments please feel free to leave any.
Saturday, November 21, 2009

This tutorial was written by me on November 22, 2009 using PSP X2. Any similarities to any other tutorial are purely and not intentional.
This tutorial is written for those with a working knowledge of PSP.
This tutorial is written for those with a working knowledge of PSP.
Supplies needed:
I'm using a Suzanne Woolcott tube find HERE
Scrap kit is a FTU from Ladka called Silver Christmas found HERE
Supplies HERE
Font: Snowcap.
Tip, sharpen and add a drop shadow as you go.
Open a new canvas 600 x 600 and floodfill with white.
Open from the kit, the snowflakes resize by 25 copy/paste to your canvas.
Resize element "stars" by 10 copy and paste, move it to the left top side, duplicate, mirror & flip.
Open tree 2 resize by 20 and move it to the left side.
Resize star 2 by 18, move to the top of the tree. Rotate 20 left.
Open frame 3 resize by 25. Go to Selection - Select all - Float. Then Adjust - Add Noise - Uniform 58, Monochrome checked. Open a paper of your choice from this kit, resize by 13, copy and paste below the frame.
Open background supplied and resize by 65 and paste between paper and frame. Paste tube of your choice.
Go to the frame layer and with Magic Wand tool click inside. Selection - Modify - Expand by 4 - Invert.
Hit delete in your keyboard to the paper & tube layer. Deselect now.
Open Box 3 from the kit, resize by 13 and paste to the left side.
Decorate your tag with the elements of your choice.
I use the following, resized by:
Bell 7, by 10
Leaves 3, by 10, rotate 90 left.
Candle 2 by 10
Cone by 8, rotate 25 left.
Box by 13.
Cones by 12.
Add cloud supplied. Duplicate twice and move it to the botton of your tag.
Add your name, copyright and you are done!
Thank you for trying my tutorial. If you have any question please feel free to email me.
Here is another sample, animated.

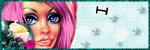
Sunday, November 8, 2009

This tutorial is written for those with a working knowledge of PSP.
Supplies needed
3 closed up tubes, I'm using Suzanne Woolcott's HERE
Scrap kit is a PTU by Sarah at Pimp My Tags w/ Scraps, Thank you!
Mask WSL-Mask # 84 HERE
Let's start:
Open a new canvas 650 x 600 you may resize/ crop later.
Floodfill with white.
Add a drop shadow as you go.
Open paper #11 copy and paste above the background layer as a new layer,
Open mask and minimize. Go to Layers - New mask layer - From image - find mask #84 - apply and merge group.
Open water color amear 1 & 2, bring both of them and paste to your canvas. See my sample tag.
Open "wing" element copy and paste, resize by 90.
Open Frame # 2 resize by 40, copy & paste to your new canvas.
Duplicate twice, now you have 3 frames. Rename each frame 1, 2, 3

Rotate Frame 3, 35 left move it to the left side.
Frame 2, mirror - and move to the right
Frame 1, rotate 35 right and move between 2 & 3.
See my tag sample.
Floodfill each frame with your favorite papers & tubes of your choice.
Open ribbon 2, resize by 65 and paste above the frame 3, see my sample tag.
With the eraser tool, erase part of the ribbon to make it look like is inserted to the frames. See image below:

Decorate your tag with Flowers 1, 2 deleting with the eraser tool in small size, one side of the flowers to make it look it is inserted to the ribbon.
I decorate mine with the staples, branch, botton 2 and word art. You can crop or resize now.
Add copyright and your name.
Hide background layer to have a transparent tag. Merge visible all layers left.
Save as a PNG.
And you are done!.
Thank you for trying my tutorial, email me with any question you may have.
Saturday, November 7, 2009

This tutorial was written by me on November 7, 2009 using PSP X2. Any similarities to any other tutorial are purely and not intentional.
This tutorial is dedicated to a good EFriend, Zulema.
Supplies needed:
I'm using a Ismael Rack tube, HERE
A Missy template #284 at Divine Intentionz
Dodle of choice.
Font: LavishlyYoursROB
Pluging: Eye Candy 400 - Gradient Glow (optional)
Let's start. Open template and duplicate by pressing SHIFT + D
Close the original. We are gonna work on the duplicated. Delete copyright layer.
Go to Image - Canvas size - 680 x 680 you can resize later if you want
Unhide background layer and floodfill with white.
Go to "shape" layer of the template, select all - float and apply texture effect: Blind
with these settins: W: 3, O: 33, Color black, light from left checked; deselect.
Add same effect to the large & small black circles just change to a color that match your tube.
Go to the "large circle" layer and with the Shape tool draw a circle with nule foreground and background color of your choice. Convert to a raster layer.
Drag this layer under the original "large circle" layer, add gaussian blur 15.
Add Dodle of your choice, your name and copyright. Apply a drop shadow to all layers.
You can now resize your tag, check the all layers option. Crop it
I used Gradient Glow to the name.
Hide background layer, save as a PNG
... you are done!
Thank you for trying my tutorial. Email me with any question you may have
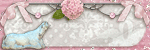
Tuesday, November 3, 2009

This tutorial was written by me on November 3, 2009. Any similarities to any other tutorial are purely and not intentional.
Suplies needed:
I'm using the amazing Artwork of Suzanne Woolcoot.
Scrap kit is a freebie from Lexine called Pink Romantic part 5, click the blinkie below the preview to go the download page. Then go to the frebies in the menu at the left.
Font: SquarePegROB
Let's start:
Open a new canvas 650 x 600, floodfill with white.
Open Frame, element 3, resize by 26, copy & paste to your new canvas.
Open the tube of your choice and paste it below the right frame, rotate tube by 8 to the right.
Open another tube and paste it below the right left frame.
Open paper 1, resize by 15, copy and paste below tubes.
With Magic Wand tool select inside of both frames, then go to selections - modify - expand by 5
Selections - invert and hit delete in your keyboard, repeat the delete to each layer of the tube and the paper.
Deselect and apply a drop shadow to each of the layers. Hide the background layer and merge visible the rest of the layer. Unhide background layer.
Open elements below & resize, copy & paste as follow:
Element 1 by 20, as a new layer below the frame, move to the left side, duplicate - mirror - flip.
Element 3, by 20, as a new layer over the frame, rotate by 10 to the left.
Element 12, by 10, duplicate, mirror, move this new dup layer close to the original to make it look like is just one branch.
Element 14 by 10 duplicate, mirror, move this dup layer close but leave a room to place next element.
Element 03, by 5, between the elements 14.
Element WA 02 by 15, as a new layer
Element 11, by 10, as a new layer, rotate by 8 to the left and place it between both frames.
See sample tag for more reference on where to place elements.
Hide background layer and merge visible.
Add copyright and your name. Save as a PNG and you are done!
Thank you for tryign my tutorial, if you have any question don't hesitage to contacme.

This tutorial was written by me on November 3, 2009. Any similarities to any other tutorial are purely and not intentional.
I'm dedicating this tutorial to a nice sweet E-Friend, Alexa.
Supplies needed:
I'm using the Artwork of Susanne Woolcott.
Ta-Ta's Cluster Frame is a freebie from Ellen at Raspberry Road Desings
Mask is a Vix's # 363
Font: Inspiration.
Open Cluster Frame and resize by 17.
Open a new canvas 560 x 420 floodfill wtih white.
Copy and paste cluster frame into this new canvas as a new layer.
With magic wand tool select inside the cluster frame, then go to
selection - modify - expand by 10
Paste the tube you are using and move it to the center of the selection.
Selections - invert and hit delete in your keyboard.
Open a new canvas 400 x 400, floodfill with a color to match your tube. Im using
color # #f2b2b2.
Open mask #363 and apply it to this new canvas by going to Layers - New mask layer -
from imagen, choose mask 363 from the drop down menu;
Then merge - merge group. Duplicate mask - mirror - merge visible.
Copy this new mask and paste it to the image where you were working before (the cluster frame)
Move the mask below the tube and certer it to cluster frame.
Hide the backgorund layer, and merge visible the remaning layers. Add your text or name.
Add your copyright and save as png.. you are done!
Thank you for trying my tutorial, if you have any question please contact me.
Subscribe to:
Posts (Atom)
About Me

- Chatita
- Hello, I'm Chatita, I live in Central North Carolina. I've been PSPing for about 6 years and I love it the more I learn the more I get addicted. I hope you enjoy my tutorials. I appreciate your visit, please contact me if you have any suggestion or question.
Contact me


TWI


