Tuesday, March 31, 2009

Click image to see original size
This tutorial was written by me, using PSP X2 but can be done with any earlier version.
Supplies needed:
Tube of your choice, I'm using the fantastic artwork of Suzanne Woolcott, must have a valid license to use her tubes, find it HERE
Scrap kit is a freebie by Jael Lopez, called "My SweetHeart" visit her blog to download this lovely kit, please don't forget to leave some love, JAELOP DESIGNS.
Also, a BG tube I'm suppling, download HERE
Font is a PTU Scrap Rhapsody, I used gradient glow (eye candy) pluging to the text, then a drop shadow
Lets start now.
As always, after you resize go to Adjust/Sharpeness/sharpnen also when you have elements where you want it add a drop shadow (1, 1, 50, 5)
Ok, lets go!
Open a new canvas 650 x 550, you can crop later. Flood fill with your fav color.
From your kit open element 2 & paste as a new layer, resize
Open the BG tube supplied and paste as a new layer to your canvas, move it below the frame element, resize by 20 less than the element 2.
With the free hand selection tool, select the border of the frame (element 2) then go to selections/modify/feather 6, go to the building tube layer: selections/invert and hit delete once on your keyboard. Hide the background layer and merge visible - unhide BG layer.
Resize the following elements and paste them in the same order I mention it below the frame.
Element 52, 36, 8 & 39 move it to the left side, duplicate/image/mirror.
Paste WA 2 and resize to fit the frame.
Above the frame, paste resized element 7 & 43 move them to the top left side of the frame.
Paste resized element 10 move it to the bottom left side of the frame, duplicate & mirror.
Paste resized element 17, move it to the bottom beside the flower. Do the same with element 17B and mirror. Open the butterflies, resize and paste, see my tag for reference.
You can now paste your fav tube.
We are now done!
Don't forget to add copyright. Save as a PNG.
Thank you for trying my tutorial. I would love to see your results. If you have any question feel free to contact me.
Monday, March 30, 2009

Click on the tag to see original size.
This tutorial was written by me, any similarity to any other tutorial is purely coincidental.I'm using the fabolous artwork of Suzanne Woolcott HERE
Scrap kit is a freebie from Seachell, called Spring Time can be download at her blog HERE
Please don't forget to leave some love when you download it.
I'm also using the FrogPond tube from Marilyn Allen, you can visit her forum for more tubes HERE You need to sign up.
I'm supplying this tube with her permission, go HERE to download it.
Font I used is SA-Cacti
Lets start,
Note: when you resize go to adjust - sharpness - sharpen, then when you have elements where you
need them add a drop shadow (1, 1, 50 & 5)
Now, let's start:
Open a new canvas 700 x 650 and fllod fill with your fav color.
Open the FrogPond tube (supplied) resize by 80, element 27 (circle frame) and paper#1 resize by 60%
Copy the circle frame and paste to your new canvas, paste paper and frogPond tube below
the frame.
With your magic wand click inside the frame, expand by 5, then: selecttions - invert,on the frogPond tube layer hit delete on your key board, do the same to the paper layer too.
Hide the background layer and merge visible frame, tube and paper.
On the merged frame layer, duplicate, on your original frame layer go to adjust - blur -gaussian blur 20.
On the same layer go to effect - texture effect - mosaic glass, with this settings: # of columns & rown 100; glas curvature 13, Edge curvature 15, grout width 5, grout duffusion 17 and simetric checked.
Open element 32 (tree)resize by 55 and paste above the dupliated frame, move it to the left side of your tag.
Open element 24 (doodle flower) , hit shift+D to duplicate, set back and foreground to this color#deb454 with the replace color or change to target tool change the color of the petals to the duplicated flower, resize both of them by 30. Copy and paste beside the tree.
Open elemente 6 (bee) resize by 15, copy and paste to your canvas, go to image - mirror.
Rotate 10 to the left and place on top of one of the doddle flower.
Resize element 37 (grass) by 15 copy and paste to your canvas, diplicate and place them leaving the tree between the two grass layers.
Open element 1 resize by 35, copy and paste to your canvas, image then mirror.
Resize element 7, by 25, copy and paste, see my tag for reference.
Resize element 9 by 10, copy & paste, rotate by 50 to the left, place it at the botton of the frame. Duplicate, mirror and move it to the top side. Open element 8 (lady bug), resize by 25, copy & paste to your canvas. move it to let right side of your canvas.
I use element 11, resized by 30, rotate 25 right to make it look like the sun, lol
You can add the tube you are using.
Ok, we are alm0s done.
*When you are happy with the position of all elements you are using you can now merge visible all layers.
Add copyright and your name to your tag.
Save as png... and you are done! If you want your tag to be with transparente BG, hide the BG layer before merging all layers and save.
Thank you for trying my tutorial, feel free to contact me if you have any question.
See you next time.
Tuesday, March 24, 2009

This tutorial was written and created by me any resemblance to any
other tutorial is purely coincidental.
Supplies Needed:
I'm using the fantastic work of Suzanne Richards.
Must have a valid license to use her artwork, can be
purchased HERE
Scrap kit is PTU called Easter Blessing
can be purchased here
Template #186 by Missy HERE
Mask: WSL_221 HERE
let's start:
Open template, press shift+D to duplicate, close original template.
Resize canvas to 650 x 550 & flood fill white.
Delete copyright layer, on the thin rectagle 1, go to selections > select all > Float and paste paper 19 (resized 60), Then selections > invert & hit delete on your keyboard. Delete the thin rectagle layers from the template after you cover it with paper. Repeat this with a diferent paper to the thing rectangle 2, 3, & 4.
Merge visible all rectagle layers you just fill with paper and apply drop shadow
Open paper 23 resize by 60. Back on the template, on rectagle1 layer:
selections > select all > foat & paste resized paper 23, selections > invert, hit
delete on you key board. Delete rectagle layer from template.
Add a drop shadow to the dotted rectangle layer
Paste resize paper22 to rectangle2 layer
I'm giving you element # & resize, I wont go by the details, see my sample for reference.
This is the order I did mine: (don't forget to add a drop shadow to each layer)
Elements 44, 45 & 46 resize by 14 & 17
Element 52 resied by 35
Element 49 reisize by 20
Element 16, 17, resized by 14
Element 48resize by 40
Element 58 resize by 20
Element 57 resize by 15
element 51 resized by 18
Element 59, 60 & 61 resized by 15
Set all elements you are using, when you are happy crop you tag to make it smaller,
hide the background layer and merge visible all left layer. Unhide background layer,
add a new raster layer above the BG selections > select all > paste paper 65 into selection
and apply mask.
With deform/pick tool rotate the mask.
Add copyright and your name. Before you save hide BG layer, so your tag will be transparent,
and will looks just fine in all blogs/ groups with diferents BG color.
Now save it as PNG You are done!!!
Thank you for trying my tutorial, please contact me if you have any question.
Wednesday, March 18, 2009

Im using the fantastic artwork of Suzane Woolcott, you can find
ther tubes HEREThe kit is a freebie from Zalina Design called "Sweet Dream" ,
download from her blog HERE
Mask is -->Becky Mask 23 , she closed her site.
Font: Doodle Kid
This tutorial is my own creation, any similarities to any other
tutorials is purely coincidental.
Ready? let start,
This kit is full size, you might need to resize all elements you
use by 20, I resized them and if it still too big I resize with the pick
or deform tool, I also sharpen and drop shadow: 1, 1, 50. 5
Open a new image 600 x 600 and flood fill with white.
Paste paper 9 and apply mask 23
Paste element 19 (window) as a new layer.
resize the tube of your choice & paste below the window if
the tube you are using does not have a background you can
use one of the paper include in the kit.
With the magic wand tool click inside frame of the window, go to
selections > modify > exapand 3 > invert and delete on your
tube layer.
paste element 55 (cloud) move it to the top right side, duplicate, slightly move
to the left.
open element 66, & paste above the window
open & paste element 56 (moon), rotate 35 to left and move it to the top of
the moon layer.
Paste element 57 above the background layer.
paste element 63 (star) and duplicate 3 times, move them to the
top of your tag.
now, go the top layer and paste element 27 (sheep) and duplicate. Resize
the copy layer by 90, slightly move it beside the original sheep.
You can add more elements of your choice to personalize your tag, when
you are done, merge layers and save as png.
I alwas use X the background layer before saving to create it transparente BG
Add copyright, your name & your are done!!! :)
Thank you for trying mu tutorial, if you have any question feel free
to email me.
Sunday, March 8, 2009

Click on the imagen to enlarge
You must have a working knowledge of PSP
I am using the beautiful artwork of Ismael Rac
can be purchased HERE
This scrap kit is Glamour, from Lacarolita design,
download it HERE
Template # 183 by Missy, can be downloaded HERE
Pluggin Xero- Porcelain.
Lets start.
*Add shadow to each layer after you are done working with it.
Open template delete copyright layer, go to the circle layer select, select all,
float, deflot & flood fill with color #f60293 or one that match your tube.
Duplicate.
Apply gaussian blur 10 to the original pink cirle you just flood fill.
Move to the duplicated layer, modify contract by 2, paste paper 10; invert and
hit delete pad in your key board.
To the star layer flood fill with white, add noice with this settings: Uniform,
30%, monochrome cheked. Then sharp.
On the Bar layer, flood fill with a color #c83f6f or one that goes with your tube.
With magic wand select one of the bars and paste a part of the tube you are using.
Do this with the rest of the bars.
Merge all layer of the tube you paste to the bars, change opacity to 70.
Apply pluging porcelain with this settings:
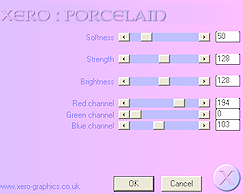
Flood fill the musical note paper 5 and paste your tube, apply porcelain pluggins
with the same settings.
Move the word layer to the top.
Add copyright and your name and we are done!
Thanks for trying my tutorial.
Saturday, March 7, 2009
I'm so happy & honored to receive my fist award from
a very talented psp artist Sunf from URBANFAIRYTALES
Thank you so very much. This is my first award and it
motivate me to keep psping.
A big big hug.
![[friends_fran.jpg]](https://blogger.googleusercontent.com/img/b/R29vZ2xl/AVvXsEjSLfwpqKKnN51lVliX6qB_tE2EYxG5lX_oo-xzeZ3Qq6gcwJsWxNdlqbMNyov66uQZ6TF9a_tfpaBwGyVHJD0PjCPQSc9rCDhoQa7ervOQQ2tQW0Dtl-n6dhw_K2M-JSVxeRkwXRa_VhQ/s1600/friends_fran.jpg)
Rule:
Pass this award to your favorite designers or to the blogs
you have downloaded something from which this time
I have to say Thank you so much to:
Blue Dreams
Divine Intentionz
Belvidotti Scraps
Ginas Gems Tuts n Such
a very talented psp artist Sunf from URBANFAIRYTALES
Thank you so very much. This is my first award and it
motivate me to keep psping.
A big big hug.
Rule:
Pass this award to your favorite designers or to the blogs
you have downloaded something from which this time
I have to say Thank you so much to:
Blue Dreams
Divine Intentionz
Belvidotti Scraps
Ginas Gems Tuts n Such
Thursday, March 5, 2009

Click on the image to see full size
This tutotial is my own creation, any similarity to any other tutorial is purely coincidence.
This tutorial was written for those who have PSP knowledge.
Supplies needed:
I'm using the fantastic artwork of Elias Chatzoudis, must have a valid license to use his art,
can be purchase HERE
Scrap kit by Ivette at Misfitsscrapz, FTU Emeraldsky, you can download HERE
Template_155 by Missy, can be download HERE
Mask WSL_83 HERE
Font I use Ambiance BT Swash
Ok, ready?... let's start
A tip I recomend is everytime you resize sharp and apply shadow to the elements to each layer
Open a new image 550 x 550
Apply mask to your fav paper from your kit.
Open papers below & resize by 50%
Open template 155 delete copyright layer.
copy and paste paper #'s to template:
Paper 2 to square layer
paper 4 to circle layer
paper 13 to frame layer
paper 8 to frame BG layer
Paste a closed up of the tube you are using to the frame BG and
lower opacity to 50
paper 10 to heart layer
paper 7 to smal hart layer.
Open ribbonwrap 2 and colorize it to match your tube, rotate 90 to left - miror
move it to the left side.
Open one of the doodle from your kit & colorize to match your tube, resize by 58%
place to the top left side and take it to the bottom layer duplicate and flip it.
Now merge all layer, apply copyright and you text.
We are done!!!
Thank you for trying my tutorial. I'd love to see your result. If you have
any question please email me.
Tuesday, March 3, 2009

Click on the imagen to see full size
I'm using the awesome art of Elias Chatzoudis, can be purchase HERE
The kit is a FTU from Bluedream Designs called Iris Charm, can be download HERE
Mask: WSL # 4 HERE
Dodle of your choice.
This tutorial is written by me, any similarity to any other tutorial is purely coincidental.
Ok, let's get started Open a canvas 600 x 600 flood fill white select all
From your Kit, open paper #1 copy & paste into selection to your canvas and apply mask.
Open frame 4, resize by 85 %
Open paper 4 copy and paste below the frame
With you magic wand click inside the frame, selection - modify - expand by 4,
Selection - invert and hit delete on your keyboard.
Copy a close up of the tube you are using and paste below the frame,
again with you magic wand click inside the frame, selection - modify - expand by 4, invert. Go to you tube layer and hit delete.
Apply shadow of your choice to your frame & tube, for this tutorial I used 0, 0, 70 & 5
Now, open Iris charm bling paste it on top of frame, resize by 50% rotate by 20,
adjust - sharp, apply shadow move it to the botton left of your frame (see imagen) duplicate - miror.
Open pendant 1 resize by 75% and move it to the top left, duplicate - miror.
Open both of the charm shamrock 2 resize by 54% sharp, apply shadow and move it to the center right of you frame, duplicate - miror.
Open charm shamrock 3 resize by 30% place it on top of each charm 2.
Set your foregroun with paper 4 and apply a brush o dodle of your choice. I add noise, sharp - sharp more.
Tip: Don't forget to sharp elements everytime you resize and apply shadow.
We are done. Add copyright & your name.
I hope you enjoy my tutorial, feel free to contac me if you have any question or to show me your results.
Thank you!!
Sunday, March 1, 2009

Click on the thumbnail to see full size
This tutorial was written by me using Psp X2, any similaritie to any other tutorial is purely coincidental.
I'm using the awesome art of Suzanne Woolcott, can be purchase HERE
Scrap kit is a FTU by Bel Vidotty: Violete Hill Here, mask WLS_167 : HERE
Filter Mura's Meister - Copies
Font of your choice.
Let's start:
Open a new canvas 600 x 600, open paper 16 from your kit copy and paste to your new canvas apply mask and merge group.
Open Cardboard copy & paste as a new layer, rotate 14 to the left, sharp and apply shadow of your choice, I always use 1, 1, 50, 5.
Open Frame 5 copy & paste to your canvas resize by 80% Open flower 08 copy & paste as a new layer, resize by 17% and duplicate 9 time, acomodate them around the frame every other hole of your frame.
With the magic wand tool click inside the frame and paste paper 20 place it under the frame, then copy and paste your favorite tube and resize it and apply shadow of your choice.
open leave 20 resize 22% and apply filter copies with this setting:

place the new leave frame below frame 5 and paper 20.
Open the scattered flower 01 from your kit, place it below paper 20 use your PICK tool to rotate it, duplicate and mirror, apply shadow.
Acomodate the rest of the flowers, tag, wrap bow, & blow 08, resizing, remember to sharp and apply shadow after resizing.
Merge all layers add copyright and your name.
I hope you enjoy my tutorial, if you have any question feel free to contact me.
Subscribe to:
Posts (Atom)
About Me

- Chatita
- Hello, I'm Chatita, I live in Central North Carolina. I've been PSPing for about 6 years and I love it the more I learn the more I get addicted. I hope you enjoy my tutorials. I appreciate your visit, please contact me if you have any suggestion or question.
Contact me


TWI


