Tuesday, March 24, 2009

This tutorial was written and created by me any resemblance to any
other tutorial is purely coincidental.
Supplies Needed:
I'm using the fantastic work of Suzanne Richards.
Must have a valid license to use her artwork, can be
purchased HERE
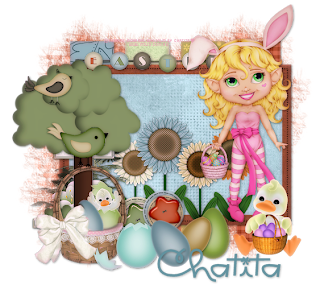
Scrap kit is PTU called Easter Blessing
can be purchased here
Template #186 by Missy HERE
Mask: WSL_221 HERE
let's start:
Open template, press shift+D to duplicate, close original template.
Resize canvas to 650 x 550 & flood fill white.
Delete copyright layer, on the thin rectagle 1, go to selections > select all > Float and paste paper 19 (resized 60), Then selections > invert & hit delete on your keyboard. Delete the thin rectagle layers from the template after you cover it with paper. Repeat this with a diferent paper to the thing rectangle 2, 3, & 4.
Merge visible all rectagle layers you just fill with paper and apply drop shadow
Open paper 23 resize by 60. Back on the template, on rectagle1 layer:
selections > select all > foat & paste resized paper 23, selections > invert, hit
delete on you key board. Delete rectagle layer from template.
Add a drop shadow to the dotted rectangle layer
Paste resize paper22 to rectangle2 layer
I'm giving you element # & resize, I wont go by the details, see my sample for reference.
This is the order I did mine: (don't forget to add a drop shadow to each layer)
Elements 44, 45 & 46 resize by 14 & 17
Element 52 resied by 35
Element 49 reisize by 20
Element 16, 17, resized by 14
Element 48resize by 40
Element 58 resize by 20
Element 57 resize by 15
element 51 resized by 18
Element 59, 60 & 61 resized by 15
Set all elements you are using, when you are happy crop you tag to make it smaller,
hide the background layer and merge visible all left layer. Unhide background layer,
add a new raster layer above the BG selections > select all > paste paper 65 into selection
and apply mask.
With deform/pick tool rotate the mask.
Add copyright and your name. Before you save hide BG layer, so your tag will be transparent,
and will looks just fine in all blogs/ groups with diferents BG color.
Now save it as PNG You are done!!!
Thank you for trying my tutorial, please contact me if you have any question.
Subscribe to:
Post Comments (Atom)
About Me

- Chatita
- Hello, I'm Chatita, I live in Central North Carolina. I've been PSPing for about 6 years and I love it the more I learn the more I get addicted. I hope you enjoy my tutorials. I appreciate your visit, please contact me if you have any suggestion or question.
My Time and Weather
Followers
My Licenses
GORJUSS : SW1440
PFD: PFD_Chatita
Psp Tubes Emporium: PTE1660
MPT: MPT8364
RAC: IRP1103A
AMI: AMIUFE30
CILM: CI4227LM
SATC: SATC1308
COD: COD-2728
B. JENSEN: BJ1174
Dreamscape Imaging: DSI1255
PFD: PFD_Chatita
Psp Tubes Emporium: PTE1660
MPT: MPT8364
RAC: IRP1103A
AMI: AMIUFE30
CILM: CI4227LM
SATC: SATC1308
COD: COD-2728
B. JENSEN: BJ1174
Dreamscape Imaging: DSI1255
Labels
- Animated (10)
- Award (7)
- Christmas Tuts (18)
- FTU Tutorials (88)
- Halloween (9)
- PTU Tutotials (89)
- Valentine Tuts (28)
If you like my tutorials PLEASE leave a little note no matter if it's just a smile. I really love writing tutorials to share with you all & I would like to know that you enjoy, try or just look at them. Please leave some love. Thank you!!!


0 comments:
Post a Comment