Monday, March 30, 2009

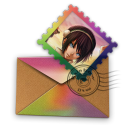
Click on the tag to see original size.
This tutorial was written by me, any similarity to any other tutorial is purely coincidental.I'm using the fabolous artwork of Suzanne Woolcott HERE
Scrap kit is a freebie from Seachell, called Spring Time can be download at her blog HERE
Please don't forget to leave some love when you download it.
I'm also using the FrogPond tube from Marilyn Allen, you can visit her forum for more tubes HERE You need to sign up.
I'm supplying this tube with her permission, go HERE to download it.
Font I used is SA-Cacti
Lets start,
Note: when you resize go to adjust - sharpness - sharpen, then when you have elements where you
need them add a drop shadow (1, 1, 50 & 5)
Now, let's start:
Open a new canvas 700 x 650 and fllod fill with your fav color.
Open the FrogPond tube (supplied) resize by 80, element 27 (circle frame) and paper#1 resize by 60%
Copy the circle frame and paste to your new canvas, paste paper and frogPond tube below
the frame.
With your magic wand click inside the frame, expand by 5, then: selecttions - invert,on the frogPond tube layer hit delete on your key board, do the same to the paper layer too.
Hide the background layer and merge visible frame, tube and paper.
On the merged frame layer, duplicate, on your original frame layer go to adjust - blur -gaussian blur 20.
On the same layer go to effect - texture effect - mosaic glass, with this settings: # of columns & rown 100; glas curvature 13, Edge curvature 15, grout width 5, grout duffusion 17 and simetric checked.
Open element 32 (tree)resize by 55 and paste above the dupliated frame, move it to the left side of your tag.
Open element 24 (doodle flower) , hit shift+D to duplicate, set back and foreground to this color#deb454 with the replace color or change to target tool change the color of the petals to the duplicated flower, resize both of them by 30. Copy and paste beside the tree.
Open elemente 6 (bee) resize by 15, copy and paste to your canvas, go to image - mirror.
Rotate 10 to the left and place on top of one of the doddle flower.
Resize element 37 (grass) by 15 copy and paste to your canvas, diplicate and place them leaving the tree between the two grass layers.
Open element 1 resize by 35, copy and paste to your canvas, image then mirror.
Resize element 7, by 25, copy and paste, see my tag for reference.
Resize element 9 by 10, copy & paste, rotate by 50 to the left, place it at the botton of the frame. Duplicate, mirror and move it to the top side. Open element 8 (lady bug), resize by 25, copy & paste to your canvas. move it to let right side of your canvas.
I use element 11, resized by 30, rotate 25 right to make it look like the sun, lol
You can add the tube you are using.
Ok, we are alm0s done.
*When you are happy with the position of all elements you are using you can now merge visible all layers.
Add copyright and your name to your tag.
Save as png... and you are done! If you want your tag to be with transparente BG, hide the BG layer before merging all layers and save.
Thank you for trying my tutorial, feel free to contact me if you have any question.
See you next time.
Subscribe to:
Post Comments (Atom)
About Me

- Chatita
- Hello, I'm Chatita, I live in Central North Carolina. I've been PSPing for about 6 years and I love it the more I learn the more I get addicted. I hope you enjoy my tutorials. I appreciate your visit, please contact me if you have any suggestion or question.
Contact me


TWI


2 comments:
It's a wonderful tutoriel. Great job
Post a Comment